Edge View · user guide
Edge View,
end to end.
Everything Edge View does, in the order you will meet it: sign in, read the map, connect a sensor, work a detection, and set up the geofences that tell you about the next one without you watching.
Overview
What Edge View is
Edge View is the map your Edge Scout sensors report to. It runs in a browser — there is nothing to install, and nothing to update — and it shows drone Remote ID broadcasts and crewed-aircraft ADS-B on one picture, live.
You can sign in and watch public detections without owning anything. Connect a sensor and your own detections join the map, with the flight history, geofencing and alerting that follow from having your own coverage.
- Live drone and crewed-aircraft detections on one map
- Flight tracks, with the operator’s position plotted alongside the aircraft
- Airspace overlays — TFRs, prohibited areas, national security and facility restrictions
- Geofences that alert by text and email on entry, exit, or both
- A device manager for every sensor you own, portable or fixed
Requirements
What you need
- A desktop browser. Chrome or Edge is required to connect a sensor by USB-C — the browser API that talks to the serial port is not available in Safari or Firefox
- An Edge View account — the free tier is enough to see the map
- Optionally, an Edge Scout sensor: mini-c, Charlie or Pro connect to the browser over USB-C; Link and Tower report to Edge View over the network and are claimed rather than connected
Setup
Sign in for the first time
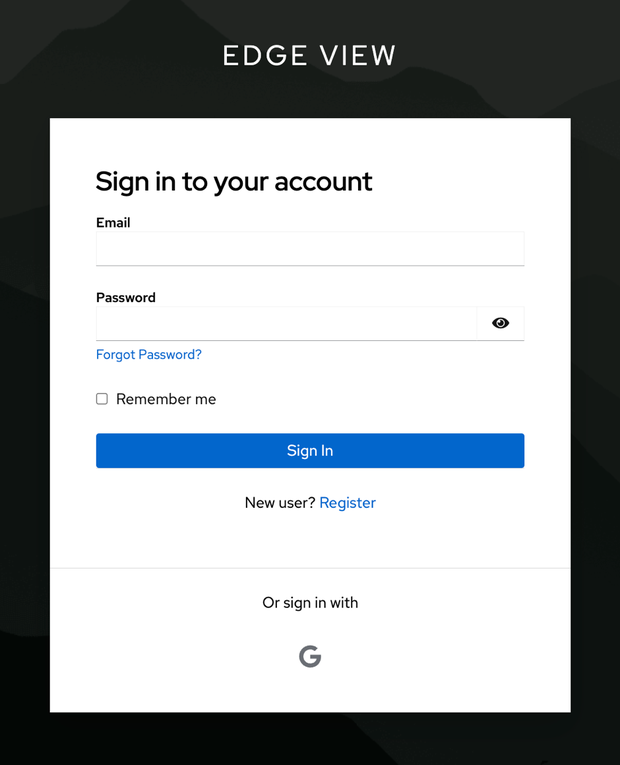
- 01 Open Edge View. You land on the sign-in screen.
- 02 Register, or sign in. New here? Choose Register under “New user?” and follow the prompts. Otherwise enter your email and password and choose Sign In.
- 03 Or use Google. If your email is a Google account, Or sign in with → the Google button signs you in without a separate password.
Orientation
Find your way around the map
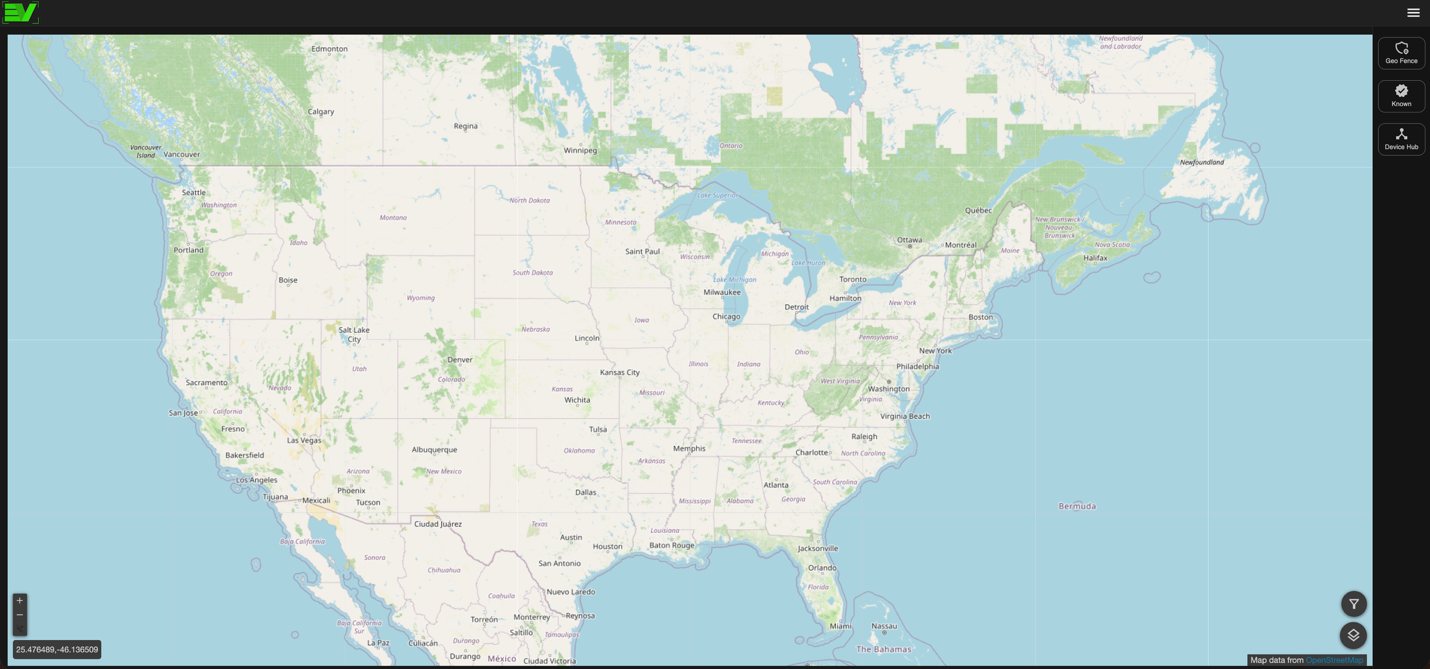
Signing in puts you straight on the map. Remote ID detections and ADS-B aircraft appear as icons and update as they move; everything else on screen is a way of deciding what you see and what you are told about.
The tool rail, on the right
| Tool | What it opens |
|---|---|
| Geo fences | Draw, name, color and alert on an area of interest. |
| Known UAS | Tag airframes you recognize by serial number, so they read differently on the map. |
| Device manager | Connect a sensor, see the ones you own, and read their flight history. |
The two buttons, lower right
The funnel opens filters; the stack below it opens base map and layers. Both are covered next.
The account menu, upper right
The menu icon at the top right carries your subscription, the privacy switch for your own detections, and Settings. See Your account, below.
The map
Filter what you see
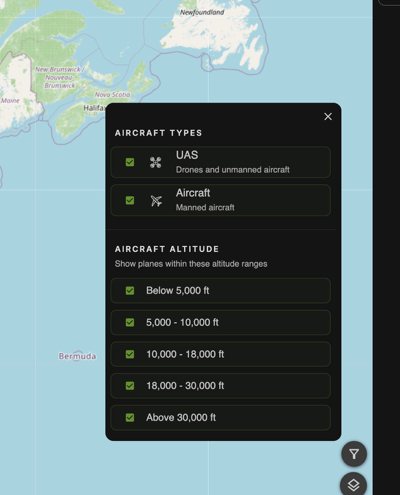
Choose the funnel at the lower right. The filter is about density: on a busy day the crewed traffic above 18,000 ft is not what you are watching for, and turning it off makes the drones easier to see.
| Filter | Options |
|---|---|
| Aircraft types | UAS — drones and unmanned aircraft. Aircraft — manned aircraft. |
| Aircraft altitude | Below 5,000 ft · 5,000–10,000 ft · 10,000–18,000 ft · 18,000–30,000 ft · Above 30,000 ft |
The map
Change the base map
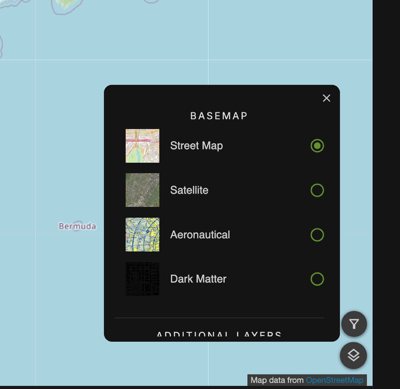
The layers button, below the funnel, opens Basemap.
| Base map | Use it for |
|---|---|
| Street Map | The default. Roads and place names — best for describing a location to someone else. |
| Satellite | Imagery. Best for judging what is actually on the ground under a track. |
| Aeronautical | Sectional charts, with airspace classes drawn as the FAA draws them. |
| Dark Matter | A low-light basemap for an operations room, or for making tracks stand out. |
The map
Add the airspace layers
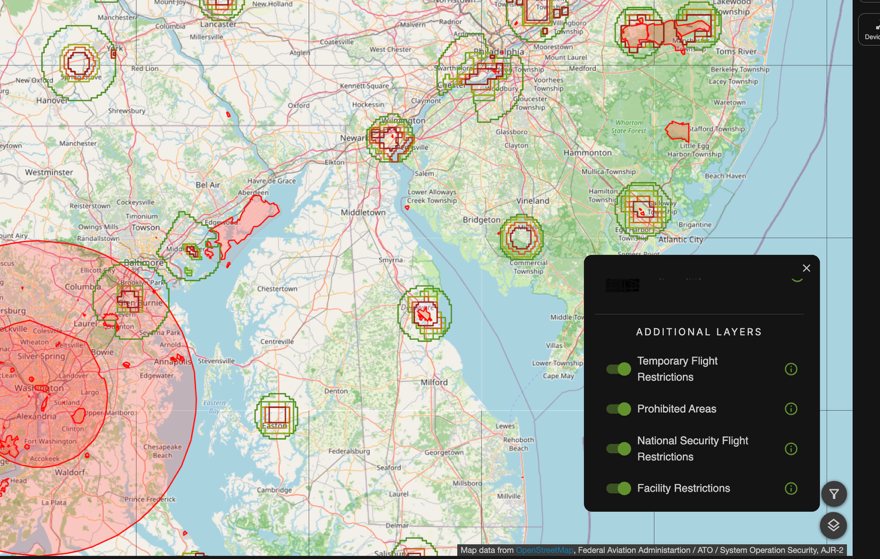
Scroll past the base maps in the same panel for Additional layers. Each is a toggle, and each has an i that explains what the layer is.
- Temporary Flight Restrictions
- Prohibited Areas
- National Security Flight Restrictions
- Facility Restrictions
Airspace
Read a restriction — and fence it
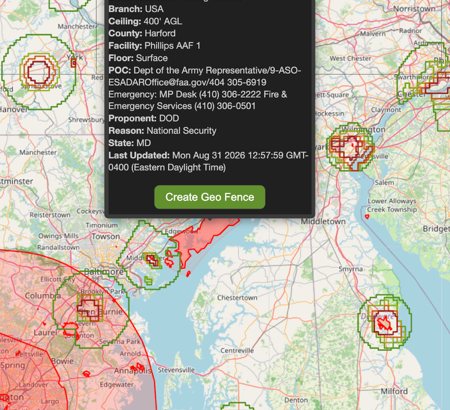
Select any overlay shape for its details.
| Field | What it tells you |
|---|---|
| Facility | The named facility the restriction belongs to. |
| Floor / Ceiling | The vertical limits — often surface to 400 ft AGL. |
| Reason, Proponent | Why it exists and who owns it. |
| POC, Emergency | Who to call, and who to call urgently. |
| Last Updated | When the source data was last refreshed. |
The popup ends with Create Geo Fence, which turns the restriction you are looking at into a geofence of your own — the fastest way to start watching an area whose boundary someone else has already defined.
Sensors
Connect a portable sensor
A portable Edge Scout — mini-c, Charlie or Pro — connects to Edge View through the browser, over the USB-C cable. Nothing is installed to do it.
- 01 Plug it in. Connect the sensor to your Mac or PC with a USB-C data cable.
- 02 Open the device manager. The rightmost tool on the map rail.
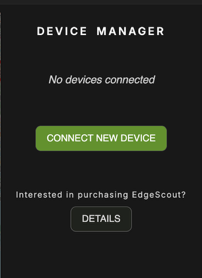
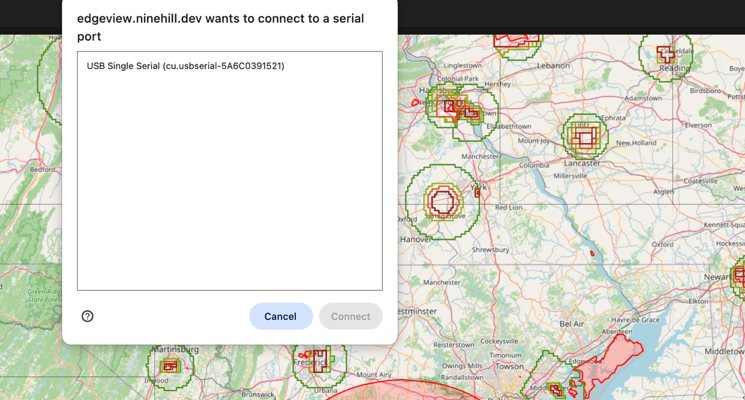
- 03 Choose CONNECT NEW DEVICE. The browser asks permission to talk to a serial port — this is the browser’s own prompt, not Edge View’s.
- 04 Pick the device, then Connect. It is listed as a USB serial device. Select it and choose Connect.
Sensors
What the device manager shows
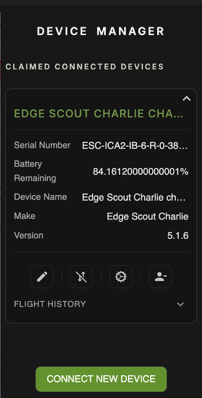
A connected sensor appears under Claimed connected devices with its own card. Fixed sensors — Link and Tower — appear in purple once they are claimed to your account and online.
| Field | What it is |
|---|---|
| Serial number | The sensor’s identity. This is what you quote to support. |
| Battery remaining | Portable sensors only. |
| Device name | Yours to set. Name it for where it is, not what it is. |
| Make | Which Edge Scout it is. |
| Version | The firmware currently on the sensor. |
The four controls
| Control | What it does |
|---|---|
| Pencil | Rename the device. |
| Crossed signal | Disconnect it. The card stays, so you can reconnect quickly. |
| Gear | Update the sensor’s software. |
| Person-minus | Release the device — removes it from your profile entirely. |
Below the device details, Flight history opens the flights that sensor has captured.
Sensors
Claim a Link or Tower
Fixed sensors never plug into a computer. They reach Edge View over their own network connection, which means the question is not connect but whose account do these detections belong to.
- 01 Open Settings → Devices. From the account menu at the top right.
- 02 Claim by serial number. The serial is on the unit, and no prior connection to a computer is needed.
An unclaimed Link or Tower that is online still streams — its detections go to the public picture. Claiming it puts those detections under your account; on Pro — Private, claiming is also what makes them private to you.
Core task
Work a detection
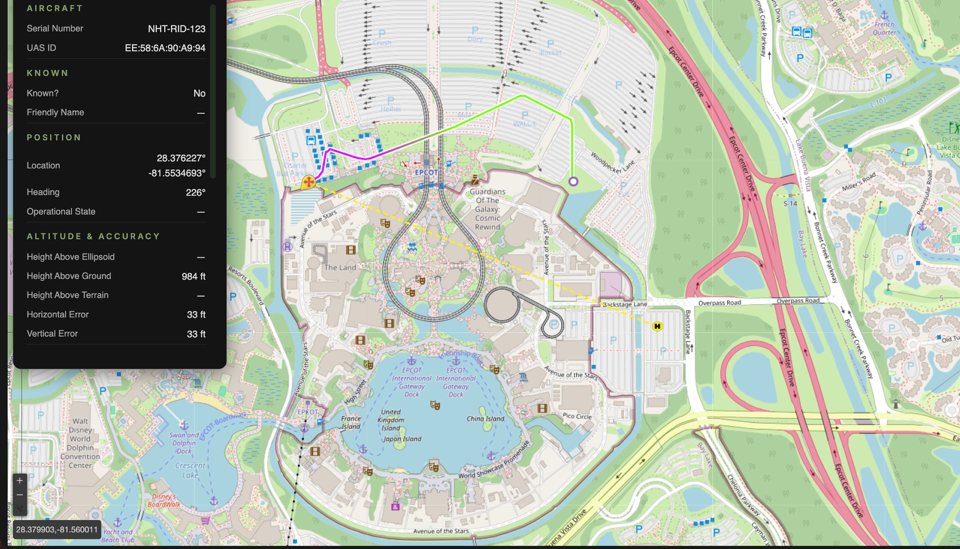
A detection arrives as a yellow drone icon. Select it and it turns red, and its flight path is drawn.
- The track is colored by altitude — green is lower, red is higher
- A yellow marker with an H is the operator’s position, not the aircraft’s
- The panel on the left carries everything the broadcast contained
What the panel tells you
| Group | Fields |
|---|---|
| Aircraft | Serial number, UAS ID |
| Known | Whether you have tagged this airframe, and the friendly name you gave it |
| Position | Latitude and longitude, heading, operational state |
| Altitude & accuracy | Height above ground, ellipsoid and terrain; horizontal and vertical error |
| Also below | Velocity, operator location, signal strength, and the serial of the receiver that heard it |
Core task
Tag a known drone
A known UAS is an airframe you have decided you recognize — your own aircraft, a contractor’s, or the neighbour’s nuisance quadcopter you have stopped needing to investigate. Tagged airframes draw in blue, so a glance at the map tells you whether anything on it is unaccounted for.
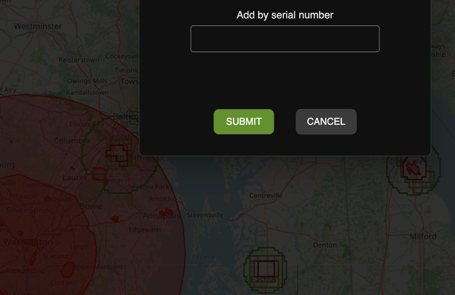
- 01 Open Known UAS. The middle tool on the map rail.
- 02 Add by serial number. Enter the airframe’s serial and choose Submit.
Core task
Create a geofence
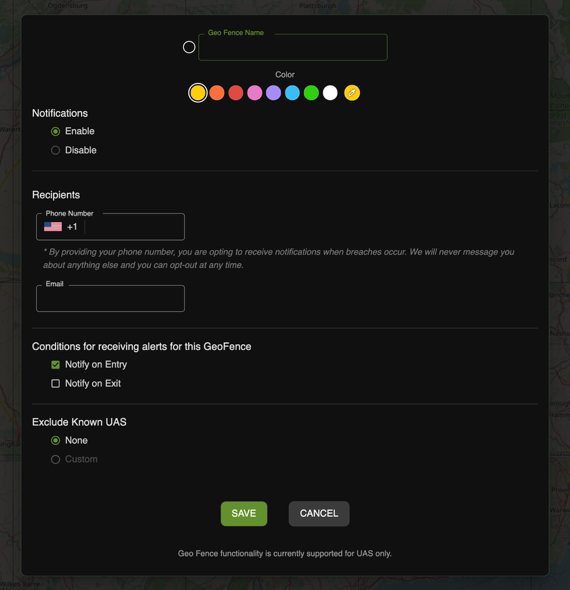
A geofence is an area you want to be told about. Draw it as a circle or a polygon, and Edge View watches it whether or not anyone is looking at the map.
- 01 Open Geo fences. The top tool on the map rail.
- 02 Choose a shape. Circle, or polygon. Draw it on the map.
- 03 Name it. Geo Fence Name — name it for the place, not the incident.
- 04 Pick a color. Eight presets, plus a custom picker. The color is how you tell two fences apart at a glance.
- 05 Enable notifications. Then add recipients: a phone number for text, an email address for email, or both.
- 06 Choose the conditions. Notify on Entry, Notify on Exit, or both.
- 07 Exclude known UAS. Leave at None to be told about everything, or exclude the airframes you have already tagged.
- 08 Save. The fence appears on the map and in the list.
Managing the ones you have
- Select a fence in the list to fly the map to it
- Hide fences you are not working, so the map stays readable
- A fence shared with you from another account keeps the color its creator gave it
Alerting
How the alerts are charged
Email alerts are free and unlimited on every paid plan. Text alerts run on a credit: one credit is one text to one recipient, so a fence with four numbers on it spends four credits per breach.
| Plan | Texts per month |
|---|---|
| Personal | 50 |
| Pro | 300 |
| Pro — Private | 500 |
- Unused credits roll over
- Bundles of 1,000 can be bought at any time, from Settings → SMS Credits
- A message the carrier rejects is never charged
- At zero credits, email alerts keep arriving — texts resume when credits are added
Account
The account menu
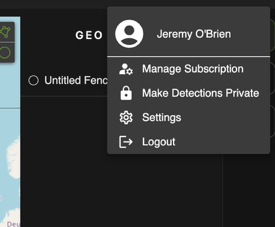
The menu icon at the top right of the map.
| Item | What it does |
|---|---|
| Manage Subscription | Change plan, or manage billing. |
| Make Detections Private | Keeps detections from your own sensors to your account instead of contributing them to the public picture. |
| Settings | Everything below. |
| Logout | Signs out of this browser. |
Account
Settings
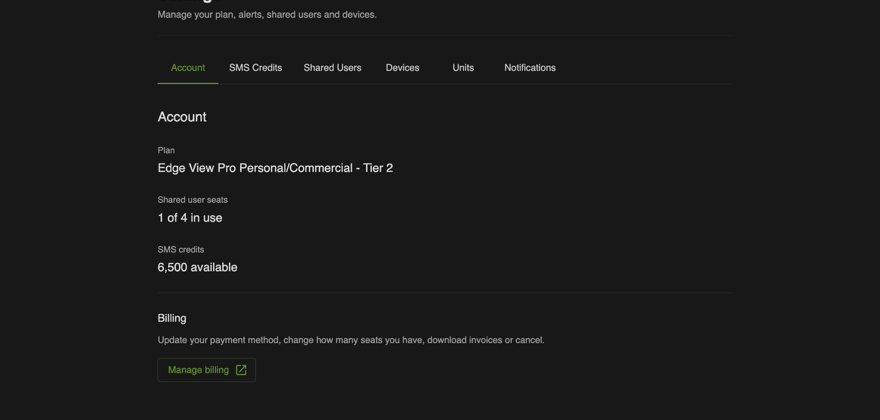
Six tabs, reachable from the account menu or directly at /settings.
| Tab | What is there |
|---|---|
| Account | Your plan, seats used, SMS credits available, and billing. |
| SMS Credits | Balance, twelve-month usage chart, low-balance warning level, transaction history, and buying more. |
| Shared Users | Who else is on the account, their roles, and buying seats. |
| Devices | Claim a Link or Tower by serial number. |
| Units | Imperial — feet, miles, mph — or metric. |
| Notifications | Your alert preferences. |
Seats and roles
Personal is a single user. Pro and Pro — Private carry the owner plus three more, and additional seats can be bought at $5 a month or $50 a year.
| Role | Can |
|---|---|
| Owner | Everything an administrator can, plus billing and seats. Always an administrator. |
| Administrator | Create and edit geofences and their notification settings, and manage devices. |
| Read-only user | See the same map, the same detections and the same fences — but change none of it. |
The owner assigns the role when they add someone, and anything an administrator creates belongs to the account, not to them.
Help
When it doesn’t work
- The device manager shows nothing when I choose CONNECT NEW DEVICE
- You are almost certainly not in Chrome or Edge — the serial-port API the browser needs is not implemented in Safari or Firefox. If you are, it is the cable: swap it for one you know carries data, not power only.
- The sensor connected, but no detections appear
- Detections require something to be flying nearby and broadcasting Remote ID. Confirm the antenna is fitted and finger-tight, then check the filters — a cleared UAS box hides exactly what you are waiting for.
- My Link or Tower is online but I cannot see it
- It is unclaimed. Settings → Devices, and claim it by serial number. Until then its detections go to the public picture rather than your account.
- A geofence is not texting me
- Check three things in order: notifications are Enabled on the fence, the number is listed as a recipient, and the account has SMS credits. At zero credits email still goes out, which is why the alert can seem half-broken.
- My own drone keeps setting off the fence
- Tag it under Known UAS, then edit the fence and exclude known airframes.
- Altitudes look wrong
- Check Settings → Units. Imperial and metric are a per-account preference, and a figure read in the wrong one is off by a factor of three.